Step-By-Step: Turning on Hyper-V on Windows 11
Hyper-V is a hypervisor-based virtualization technology developed by Microsoft. It allows users to create and run virtual machines (VMs) on a physical computer, enabling multiple operating systems to run concurrently on the same hardware. Hyper-V is available as a feature in Windows Server operating systems and is also included in some versions of Windows client operating systems, such as Windows 10 and 11, Pro and Enterprise.
This Step-By-Step guide will show you how to enable and configure Hyper-V on a computer running Windows 11.
On this page:
- Key features and concepts related to Hyper-V
- Step 1: Checking if your system is compatible
- Step 2: Enabling Hyper-V on Windows 11
- Step 3: Configuring Hyper-V settings
- Step 4: Creating a Virtual Machine
- Step 5: Configuring Virtual Machine settings
- Extra: Modern management of the Hyper-V with Windows Admin Center
- Bottom Line
Let’s begin.
Key features and concepts related to Hyper-V
Here are some key features and concepts related to Hyper-V:
- Hypervisor: Hyper-V utilizes a Type 1 hypervisor, which is a software layer that directly interacts with the underlying hardware. This hypervisor manages and allocates hardware resources to virtual machines, ensuring their isolation and optimal performance.
- Virtual Machines: Hyper-V allows you to create and manage virtual machines, which are independent instances of operating systems running on the same physical server. Each virtual machine has its own virtual hardware, including virtual processors, memory, storage, and network interfaces. These virtual machines can run different operating systems, such as Windows, Linux, or others.
- Live Migration (available only in Hyper-V Clusters on Windows Servers): Hyper-V supports live migration, which enables you to move a running virtual machine from one physical server to another without causing downtime or service interruption. This feature is beneficial for load balancing, hardware maintenance, or scaling the virtual infrastructure.
- Integration Services: Hyper-V provides Integration Services, which are a set of drivers and services that enhance the performance and functionality of virtual machines. These services enable features like time synchronization, improved network and storage performance, and mouse integration between the virtual machine and the host.
- Virtual Switch: Hyper-V includes a virtual switch, which acts as a network bridge between virtual machines and the physical network. It enables communication between virtual machines, as well as connectivity to external networks and resources.
- Snapshots/Checkpoints (Windows Server/Windows 10 or 11, respectively): Hyper-V allows you to take snapshots/checkpoints of virtual machines, which capture the state of the VM at a specific point in time. Snapshots/checkpoints are useful for creating backups or for testing and experimentation, as they allow you to revert the VM back to a previous state if needed.
Hyper-V is widely used in enterprise environments for server virtualization, consolidation, and creating test and development environments. It provides a robust and scalable virtualization platform that enables organizations to optimize their hardware resources, improve flexibility, and reduce costs associated with maintaining physical infrastructure.
Step 1: Checking if your system is compatible
To install Hyper-V on Windows, you need to ensure that your system meets the necessary hardware and software requirements. Here are the requirements to install Hyper-V:
Hardware Requirements:
- Processor: Your computer’s processor must support hardware-assisted virtualization. Most modern processors have this feature, but it may need to be enabled in the BIOS settings. Look for options such as “Virtualization Technology (VT)” or “Intel VT-x” for Intel processors, or “AMD-V” for AMD processors.
- Memory (RAM): The amount of RAM required depends on the number and size of virtual machines you plan to run simultaneously. Microsoft recommends a minimum of 4 GB of RAM for the host operating system, but it’s advisable to have more if you plan to run resource-intensive virtual machines.
- Storage: Sufficient disk space is necessary to store virtual machine files. The exact amount depends on the size of the virtual machines and the number of virtual hard disks you plan to create. A minimum of 50 GB of free space on the system drive is recommended.
- Networking: A network adapter is required to connect virtual machines to the network. Ensure that your computer has a compatible network interface card (NIC) that is properly installed and functioning.
Software Requirements:
- Operating System: Hyper-V is a feature available in specific editions of Windows. To install Hyper-V, you need a 64-bit version of Windows 11 Pro or Enterprise.
- Compatibility: Check for any software or hardware components that may not be compatible with Hyper-V. Some software or device drivers may conflict with Hyper-V, so it’s important to verify compatibility before installation.
To check if your system is compatible, follow these steps:
- Press the Windows key + R to open the Run dialog box.
- Type msinfo32 and press Enter.
- In the System Information window, scroll down to the “System Summary” section and look for the Hyper-V Requirements line. If it says “Yes”, then your system is compatible.
Step 2: Enabling Hyper-V on Windows 11
Once you have verified that your system meets the requirements mentioned above, you can proceed with the installation of Hyper-V. Following the installation, you’ll be able to create and manage virtual machines on your Windows system, allowing you to run multiple operating systems or test software configurations in isolated environments. You can follow these steps to enable Hyper-V on your Windows 11:
 1. Press the "Windows key + R" to open the Run dialog box


Step 3: Configuring Hyper-V settings
Hyper-V Settings provide a range of configurable options that allow you to customize the behavior and functionality of the Hyper-V virtualization platform on your Windows system.
 1. Click your computer node in left-hand pane of "Hyper-V Manager" console and all host settings are reachable through the context menu in right-hand pane


Here is a description of the main settings that you can change in Hyper-V Settings:
Hyper-V Settings
- Server
- Virtual Hard Disks: This setting allows you to specify the default location where virtual hard disk (VHD or VHDX) files are stored.
- Virtual Machines: In this setting, you can specify the default location where virtual machine configuration files are stored.
- NUMA Spanning: Non-Uniform Memory Access (NUMA) is a hardware architecture that provides faster memory access to processors. This setting allows you to enable or disable NUMA spanning, which determines how virtual machines are distributed across NUMA nodes in a host system.
- Storage Migrations: allows you to manage the movement of virtual machine storage between different storage locations or devices. This feature is useful when you need to migrate virtual machines to new storage devices, such as when upgrading hardware or reallocating storage resources.
- Enhanced Session Mode Policy: provides improved integration between the host and guest operating systems, allowing features like clipboard sharing and device redirection.
- User
- Keyboard: defines behavior of Windows key combinations when running Virtual Machine Connection.
- Mouse Release Key: specifies the key combination used to release the mouse when virtual machine drivers are not installed, when running Virtual Machine Connection.
- Enhanced Session Mode: configures user-level improved integration between the host and guest operating systems, allowing features like clipboard sharing and device redirection.
- Reset Check Boxes: restores Hyper-V confirmation messages and wizard pages that are hidden by selecting check boxes.
Virtual Switch Manager
- New virtual network switch: creates a virtual switch that binds to the physical network adapter so that virtual machines can access a physical network.
- Default Switch/Default Network: allows configuring the default switch and default network created during installation of Hyper-V, that gives virtual machines access to the computer’s network using NAT (network address translation).
- Global Network Settings/MAC Address Range: define the range of media access control (MAC) addresses that can be assigned dynamically to virtual network adapters.
Virtual SAN Manager
- Virtual Fibre Channel SANs/New Fibre Channel SAN: allows adding a Virtual Fibre Channel SAN in the case physical HBA ports are present in the machine running Hyper-V, so virtual Fibre Channel adapters can be added to Virtual Machines and connected to virtual SAN.
- Global Fibre Channel Settings/World Wide Names: used to define the range of World Wide Port Name (WWPN) and World Wide Node Name (WWNN) addresses that can be assigned dynamically to a virtual Fibre Channel port.
Step 4: Creating a Virtual Machine
 1. In the "Hyper-V Manager" window, click on "New" in the Actions pane on the right side of the window. This will start the "New Virtual Machine" Wizard


Step 5: Configuring Virtual Machine settings
The Settings dialog is reached through the context menu for a virtual machine. The two ways to gain access to the context menu are by right-clicking the virtual machine or by highlighting the virtual machine in the list so that its context menu appears in the lower portion of the right pane of Hyper-V Manager. Just click Settings from the context menu, and you’ll be presented with the settings dialog for that virtual machine. After performing the changes you want or need, click the OK:
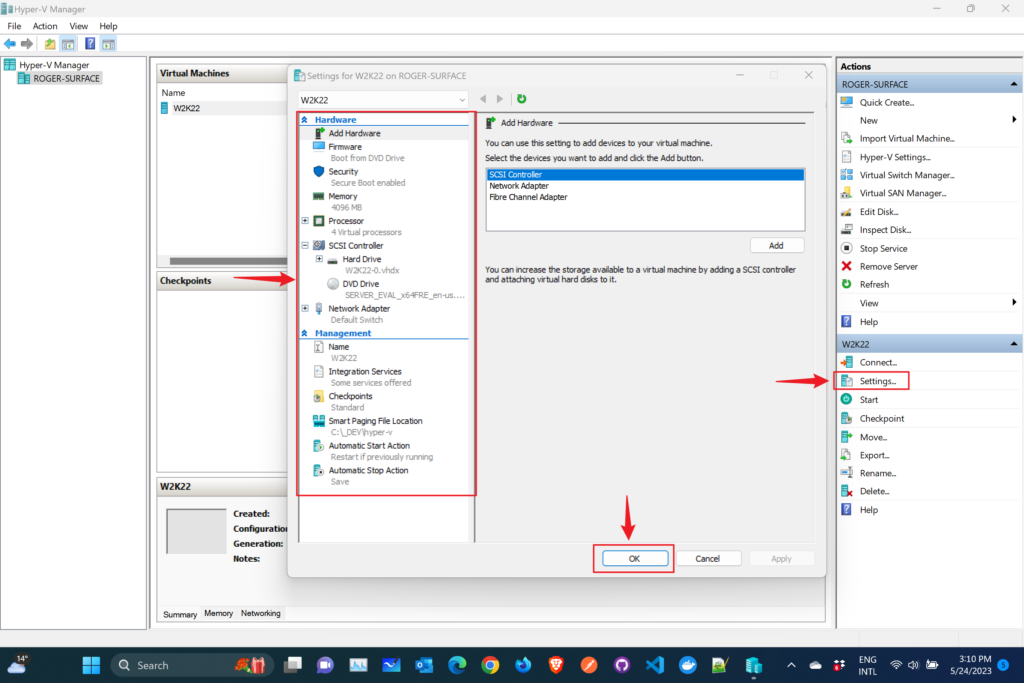
Hardware
- Add Hardware: allows adding devices (SCSI Controller, Network Adapter or Fibre Channel Adapter) to virtual machines.
- Firmware: defines order in which boot entries are checked to start the operating system.
- Security: configuration of security-related settings, such as Secure Boot and shielding against unauthorized access.
- Memory: Allocation of memory resources to the virtual machine. Dynamic Memory, which allows the virtual machine to dynamically adjust its memory usage based on demand.
- Processor: configuration of virtual processors, including the number of virtual processors assigned to the virtual machine.
- SCSI Controller: configuration of virtual hard disks and their associated settings, and options to create, attach, and manage virtual hard disks, including choosing storage type (fixed or dynamically expanding) and location.
- Network Adapter: Configuration of virtual network adapters, including the number of network adapters and their connection types (external, internal, or private), and advanced networking features such as VLAN identification and MAC address assignment.
Management
- Name: allows renaming the virtual machine.
- Integration Services: enable enhanced functionality and performance between the host and virtual machine. Settings for Time synchronization, Data Exchange, Heartbeat, Backup, Guest Services, and more.
- Checkpoints: configuration options for managing and using checkpoints (formerly known as snapshots) of the virtual machine.
- Smart Paging File Location: settings for specifying the location of the Smart Paging file, which is used when there is insufficient memory available to start a virtual machine.
- Automatic Start Action: configuration options for the action to be taken when the physical computer starts.
- Automatic Stop Action: configuration options for the action to be taken when the host shuts down or restarts.
Extra: Modern management of the Hyper-V with Windows Admin Center
Windows Admin Center is a powerful and intuitive browser-based management tool designed to simplify and streamline the administration of Windows Server and Windows 10 systems. It provides a centralized dashboard that allows IT administrators to remotely manage and monitor various aspects of their network infrastructure, including servers, clusters, virtual machines, and hyper-converged infrastructure. With its user-friendly interface and comprehensive set of tools, Windows Admin Center offers a convenient and efficient way to perform tasks such as system configuration, performance monitoring, event log analysis, and troubleshooting. It enables administrators to efficiently manage their Windows environments from anywhere, improving productivity and enhancing the overall management experience.
Download Page: Windows Admin Center
 1. Access the Download Page for Windows Admin Center informed in the post, and click "Download Windows Admin Center"


Bottom Line
Enabling Hyper-V on your Windows 11 device is a quick and straightforward process that can benefit users with different kind of demands.
Overall, installing Hyper-V on a Windows client operating system provides users with a flexible, scalable, and efficient virtualization platform. It offers benefits such as hardware virtualization, isolation and sandboxing, software development and testing capabilities, legacy application support, enhanced security, centralized management, resource optimization, and cost savings. These advantages make Hyper-V a valuable tool for individuals and organizations looking to leverage virtualization technology on their Windows systems.