Implementing Hyper-V virtual networks routing with MikroTik Cloud Hosted Router (CHR) 7.9.2
- Implementing Hyper-V virtual networks routing with Netgate pfSense 2.6.0
- Implementing Hyper-V virtual networks routing with MikroTik Cloud Hosted Router (CHR) 7.9.2
- Virtual switches and routing in Hyper-V – Overview and Summary
Welcome to the second installment of our series on virtual switches and routing in Hyper-V. In this post, we will dive into one specific routing option: implementing virtual network routing with MikroTik Cloud Hosted Router (CHR) 7.9.2. As part of this series, we aim to provide you with comprehensive insights into various routing possibilities in Hyper-V, enabling you to make informed decisions when configuring your virtualized network environments.
Routing plays a vital role in virtualized environments, allowing different virtual networks to communicate with each other and with external networks. MikroTik RouterOS, with its feature-rich capabilities and robust routing functionalities, presents an excellent choice for implementing virtual network routing in Hyper-V. In this post, we will focus on MikroTik Cloud Hosted Router (CHR) version 7.9.2 as a solution for routing between virtual networks within Hyper-V.
On this page
- Technology Overview
- Solution Overview
- System Requirements
- Implementation
- Testing and Validation
- Bottom Line
Let’s begin.
Technology Overview
MikroTik Cloud Hosted Router (CHR) is a RouterOS version intended for running as a virtual machine. It supports the x86 64-bit architecture and can be used on most of the popular hypervisors such as VMWare, Hyper-V, VirtualBox, KVM, and others.
CHR has full RouterOS features enabled by default but has a different licensing model than other RouterOS versions:
Features
Configuration
- MAC-based access for initial configuration
- WinBox – standalone Windows GUI configuration tool
- Webfig – advanced web-based configuration interface
- MikroTik – Android and iOS-based configuration tool
- Powerful command-line configuration interface with integrated scripting capabilities, accessible via local terminal, serial console, telnet and ssh
- API – the way to create your own configuration and monitoring applications
Backup/Restore
- Binary configuration backup saving and loading
- Configuration export and import in human-readable text format
Firewall
- Stateful filtering
- Source and destination NAT
- NAT helpers (h323, pptp, quake3, sip, ftp, irc, tftp)
- Internal connection, routing and packet marks
- Filtering by IP address and address range, port and port range, IP protocol, DSCP and many more
- Address lists
- Custom Layer7 matcher
- IPv6 support
- PCC – per connection classifier, used in load balancing configurations
- RAW filtering to bypass connection tracking.
Routing
- Static routing
- Virtual Routing and Forwarding (VRF)
- Policy based routing
- Interface routing
- ECMP routing
- IPv4 dynamic routing protocols: RIP v1/v2, OSPFv2, BGP v4
- IPv6 dynamic routing protocols: RIPng, OSPFv3, BGP
- Bidirectional Forwarding Detection (BFD)
MPLS
- Static Label bindings for IPv4
- Label Distribution protocol for IPv4
- RSVP Traffic Engineering tunnels
- VPLS MP-BGP based autodiscovery and signaling
- MP-BGP based MPLS IP VPN
VPN
- IPSec – tunnel and transport mode, certificate or PSK, AH and ESP security protocols.
- IKEv2 support
- AES-NI hardware acceleration support for IPSec
- Point to point tunneling ( OpenVPN, PPTP, PPPoE, L2TP, SSTP)
- Advanced PPP features (MLPPP, BCP)
- Simple tunnels ( IPIP, EoIP) IPv4 andIPv6 support
- 6to4 tunnel support (IPv6 over IPv4 network)
- VLAN – IEEE802.1q Virtual LAN support, Q-in-Q support
- MPLS based VPNs
- WireGuard
- ZeroTier
Wireless
- IEEE802.11a/b/g wireless client and access point
- Full IEEE802.11n support
- Nstreme and Nstreme2 proprietary protocols
- NV2 protocol
- Wireless Distribution System (WDS)
- Virtual AP
- WEP, WPA, WPA2
- Access control list
- Wireless client roaming
- WMM
- HWMP+ Wireless MESH protocol
- MME wireless routing protocol
DHCP
- Per interface DHCP server
- DHCP client and relay
- Static and dynamic DHCP leases
- RADIUS support
- Custom DHCP options
- DHCPv6 Prefix Delegation (DHCPv6-PD)
- DHCPv6 Client
Hotspot
- Plug-n-Play access to the Network
- Authentication of local Network Clients
- Users Accounting
- RADIUS support for Authentication and Accounting
QoS
- Hierarchical Token Bucket ( HTB) QoS system with CIR, MIR, burst and priority support
- Simple and fast solution for basic QoS implementation – Simple queues
- Dynamic client rate equalization ( PCQ)
Proxy
- HTTP caching proxy server
- Transparent HTTP proxy
- SOCKS protocol support
- DNS static entries
- Support for caching on a separate drive
- Parent proxy support
- Access control list
- Caching list
Tools
- Ping, traceroute
- Bandwidth test, ping flood
- Packet sniffer, torch
- Telnet, ssh
- E-mail and SMS send tools
- Automated script execution tools
- CALEA
- File Fetch tool
- Advanced traffic generator
- WoL (Wake on LAN) sending
Other features
- Samba support
- OpenFlow support
- Bridging – spanning tree protocol (STP, RSTP), bridge firewall and MAC natting.
- Dynamic DNS update tool
- NTP client/server and synchronization with GPS system
- VRRP v2 and v3 support
- SNMP
- M3P – MikroTik Packet packer protocol for wireless links and ethernet
- MNDP – MikroTik neighbor discovery protocol, supports CDP (Cisco discovery protocol)
- RADIUS authentication and accounting
- TFTP server
- Synchronous interface support (Farsync cards only) (Removed in v5.x)
- Asynchronous – serial PPP dial-in/dial-out, dial on demand
- ISDN – dial-in/dial-out, 128K bundle support, Cisco HDLC, x75i, x75ui, x75bui line protocols, dial on demand
Kernel version
- RouterOS version 7.x uses 5.6.3
Supported Encryptions
RouterOS 7 is used for the management of network (telecommunication) devices.
- RouterOS 7 includes encryption features (components), intended for data (information) security, passed through telecommunication channels and device control channels.
- All encryption features (components) are an integral part of RouterOS 7 and can not be changed by the end-users.
- RouterOS 7 is intended for installation by end-users without significant support from the vendor.
- RouterOS 7 uses the following security protocols:
- IPSec: DES (56 bit) / 3DES (168 bit) / AES (128, 192, 256 bit) / Blowfish (448 bit) / Twofish (256 bit) / Camelia (128, 192, 256 bit)
PPTP (with MPPE): RC4 (128 bit)
L2TP (with MPPE): RC4 (128 bit)
SNMP: DES (56 bit) / AES (128 bit)
SSH: Blowfish: (128 bit) / 3DES: (192 bit) / AES: (128, 192, 256 bit)
SSTP: AES (256 bit) / RC4 (128 bit)
Used in WinBox connection (nameless): AES (128 bit)
WEP: RC4 (104 bit)
WPA-TKIP: RC4 (128 bit)
WPA2-TKIP: RC4 (128 bit)
WPA-AES: AES (128 bit)
WPA2-AES: AES (128 bit)
HTTPS: NULL, RC4, DES, DES40, 3DES, AES (128, 192, 256 bit)
Licensing
The CHR has 4 license levels:
- free (speed limit 1Mbit): allows CHR to run indefinitely. It is limited to 1Mbps upload per interface. All the rest of the features provided by CHR are available without restrictions. To use this, all you have to do is download the disk image file from our download page and create a virtual guest.
- p1 (perpetual-1, speed limit 1Gbit): allows CHR to run indefinitely. It is limited to 1Gbps upload per interface. All the rest of the features provided by CHR are available without restrictions. It is possible to upgrade p1 to p10 or p-unlimited (New license level can be purchased by standard price)
- p10 (perpetual-10, speed limit 10Gbit): allows CHR to run indefinitely. It is limited to 10Gbps upload per interface. All the rest of the features provided by CHR are available without restrictions. It is possible to upgrade p10 to p-unlimited
- p-unlimited (unlimited speed): allows CHR to run indefinitely. It is the highest tier license and it has no enforced limitations.
The 60-day free trial license is available for all paid license levels. To get the free trial license, you have to have an account on MikroTik.com as all license management is done there.
Perpetual is a lifetime license (buy once, use forever). It is possible to transfer a perpetual license to another CHR instance. A running CHR instance will indicate the time when it has to access the account server to renew its license. If the CHR instance will not be able to renew the license it will behave as if the trial period has run out and will not allow an upgrade of RouterOS to a newer version.
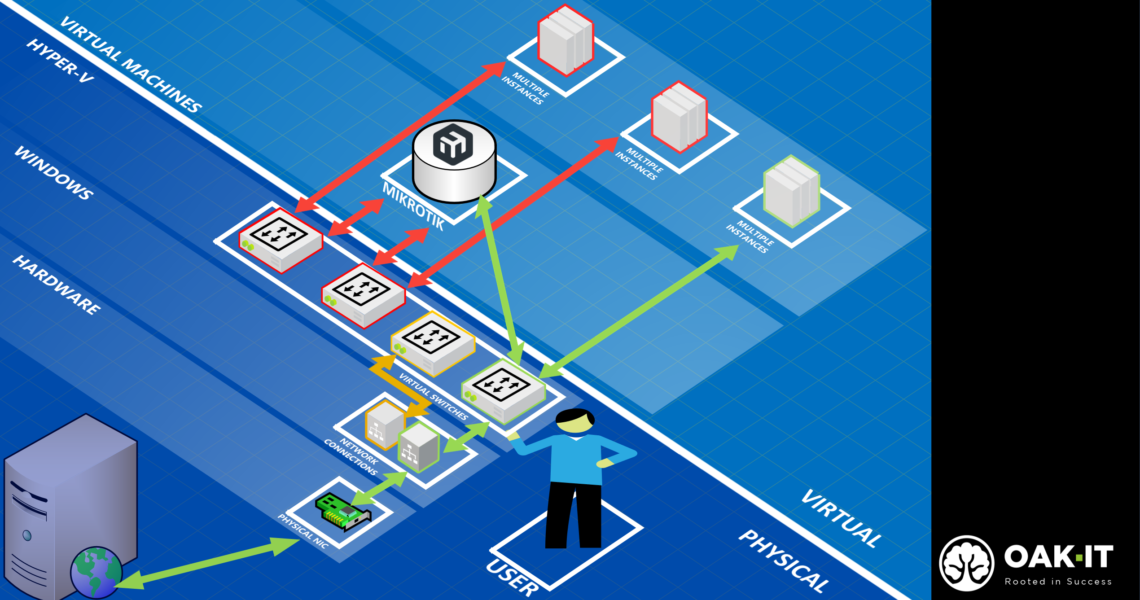
Solution Overview
- Our Hyper-V has 3 Virtual Switches:
 LAB (External): connected to External network (physical NIC/network connection), with access to the Internet, allowing management operating system to share that network adapter. IP configuration is automatically set by DHCP in that physical network.


- Virtual Machines are connected to private networks Private A and Private B.
- Network segmentation must be preserved.
- Flexible network topology is required, so additional virtual networks can be added later.
- Interconnectivity between Private Networks, and with the hypervisor (Hyper-V) host needs to be established.
- Virtual Machines connected only to private networks require accessing the Internet to download updates
Solution Blueprint

System Requirements
- Hyper-V Host: if you do not have it installed yet, you can find how to do it on Step-By-Step: Turning on Hyper-V on Windows 11
- WinBox 3.38 (32-bit: download / 64-bit: download): a small utility that allows the administration of MikroTik RouterOS using a fast and simple GUI.
- MikroTik Cloud Hosted Router 7.9.2 (Stable) VHDX image (download): a RouterOS version intended for running as a virtual machine. It supports the x86 64-bit architecture and can be used on most of the popular hypervisors such as VMWare, Hyper-V, VirtualBox, KVM, and others.
- Host CPU: 64-bit with virtualization support
- RAM: 128MB or more (Max: 128GB)
- Disk: 128MB disk space for the CHR virtual hard drive (Max: 16GB)
The minimum required RAM depends on interface count and CPU count. You can get an approximate number by using the following formula:
- RouterOS v7 – RAM = 256 + [ 8 × (CPU_COUNT) × (INTERFACE_COUNT – 1) ]
Note: Vendor recommends allocating at least 1024MiB of RAM for CHR instances.
Usable Network and Disk interfaces on Hyper-V
- Network: Network adapter, Legacy Network adapter
- Disk: IDE, SCSI
Note: SCSI controller Hyper-V is usable just for secondary disks, system image must be used with IDE controller!
Implementation
| For this exercise, we created a Hyper-V virtual machine with the following configuration: Name: RT-MIKROTIK791-01 Generation: Generation 1 BIOS: Startup order: IDE, CD, Legacy Network adapter, Floppy Memory: 512 MB Processor: Number of virtual processors: 2 IDE Controller 0: No Hard Drive/No DVD Drive Network Adapters: 1) Connected to Virtual Switch LAB (External) 2) Connected to Virtual Switch LAB (Private A) 3) Connected to Virtual Switch LAB (Private B) |
 1. On your lab machine running Hyper-V, access "https://mikrotik.com/download" in a browser, click "WinBox" and then the proper option, according to your operating system architecture


Testing and Validation
 1. Make sure you are on a machine connected only to "Private A" virtual switch by typing the following commands and pressing "Enter" after them: "[Environment]::MachineName" and "Get-NetIPConfiguration", validating your network configuration. Command "Invoke-RestMethod -Uri http://ipconfig.me" should return your external IP address if routing is working properly and machine now has access to the internet.


Bottom Line
As we conclude this post on implementing virtual network routing with MikroTik 7.9.2 in Hyper-V, we encourage you to take the next steps and try out these concepts in your own virtualized network setups. Your hands-on experience will be invaluable in gaining a deeper understanding of how MikroTik RouterOS can enhance your network routing capabilities.
We highly value your feedback and would love to hear from you. If you have any questions, face any challenges, or need further clarification, please reach out to us. Your input not only helps us improve this series but also contributes to the wider community of knowledge-sharing.
In the upcoming posts, we will explore other routing options in Hyper-V, providing you with more practical examples and detailed discussions. Our goal is to empower you with the tools and knowledge needed to optimize your virtual network architecture.
Remember, virtual switches and routing in Hyper-V offer endless possibilities. By leveraging the right techniques and solutions, you can create robust and efficient virtualized network infrastructures. So, let’s continue this journey together, learning, implementing, and unlocking the full potential of Hyper-V’s routing capabilities.